Window Pane
You will need
Font of your choice
My Tube HERE or Tube of your choice
Rose Tube by Rainbow Coffi HERE or Tube of your choice
This tutorial was written using PSP 8 and assumes you will be using the tubes provided.
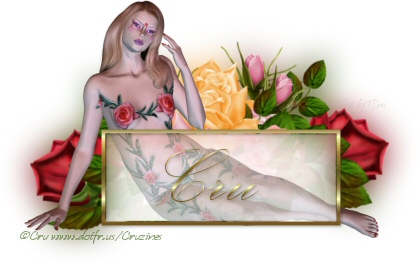
File - New Image - 500 x 500 transparent
Open your Rose tube and resize it to 425 width, with the following settings:
Resample using Smart Size checked.
Lock aspect ratio checked.
Copy your tube and paste it in your tag as a new raster layer.
Duplicate this layer and go to Image - Mirror to mirror the duplicate layer.
Open your main tube and resize it to 425 width. Copy and paste it as a new raster layer. Duplicate this layer.
With your mover tool, move your roses layers around underneath the main tube layers, until you are happy with the way they are positioned. Do not move the main tube layers.
Go to your layer pallette and close off visibility of the two main tube layers and the very bottom layer by clicking on the eyes.
Highlight one of the rose layers and merge visible to merge the two rose layers into one.
Duplicate this layer twice.
Highlight the bottom rose layer and:
Adjust - Blur
then
Adjust - Gaussian Blur - Radius 16
Make all your layers visible again.
Go to your Shapes Tool. We're going to draw a rectangle. Close out your background. Fill - Select a nice metallic gradient for your box. Create as a vector. Anti alias checked. Width - 400
Scale and the box until you are happy with it. Convert to a raster layer.
Take your magic wand and tap inside your box to select it. Feather - 1
Go to your bottom flower layer and press Delete
Got to your bottom girl or main tube layer and press Delete.
Selections - Invert
Go to the top flower layer and hit Delete. Lower the layer opacity to between 8 - 10.
Go to the top girl layer. Hit Delete. Lower the opacity on this layer to 40.
Selections - Select None
Go to your frame layer and add a Drop Shadow:
Offset Vertical: 1
Offset Horizontal: 1
Opacity: 40
Blur: 4
Color - Black
Add your text, using the font of your choice. Size to fit your box. Add a drop shadow, same as above.
Add your artist's copyright and your license number if applicable. Add your tagged by if you use one.
Layers - Merge Visible
Copy and Paste as a new image. Export as a jpg or png file, whichever you use.
You're finished!
Copyright Tori Beveridge aka Cru 2005 - 2012